

Why Do Ratchet Straps Come Loose During Transport?
- Loose Ratchet Straps: Retighten or Replace?
- Why Ratchet Straps Lose Tension
- 1. Cargo Settles or Compresses
- 2. The Load or Hooks Change Position
- 3. The Strap Was Not Installed Correctly
- 4. Sharp Edges Damage the Webbing
- 5. The Assembly Is Worn or Damaged
- How to Check Loose Ratchet Straps
- Step 1: Stop Safely
- Step 2: Inspect the Cargo
- Step 3: Inspect the Complete Assembly
- Step 4: Retighten or Replace
- Step 5: Record Recurring Problems
- When Should You Recheck Ratchet Straps?
- When to Remove a Ratchet Strap from Service
- Contact An Thanh Tech for Custom Manufacturing
Ratchet straps coming loose during transport may indicate cargo settling, incorrect threading or damaged hardware. An Thanh Tech, a cargo securing hardware manufacturer in Ho Chi Minh City, Vietnam, explains what to check, when to retighten and when to replace your straps.
Ratchet straps can lose tension during transport because cargo settles, the load shifts, hooks move out of position, or the webbing is incorrectly threaded. Before tightening a loose strap, check both the cargo and the complete tie-down assembly. Retightening alone will not correct an unstable load or damaged equipment.
In this guide, An Thanh Tech, a ratchet strap manufacturer with a factory in Ho Chi Minh City, Vietnam, explains how to identify the cause, inspect your straps and decide whether to retighten or replace them.
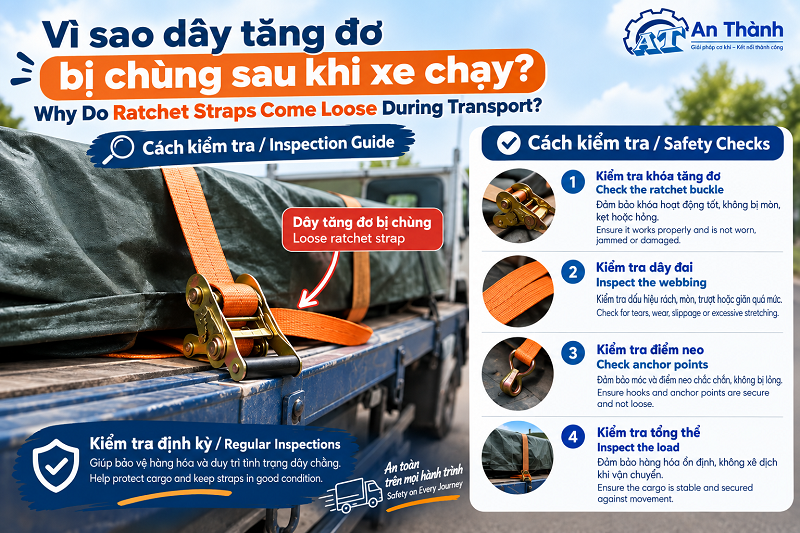
Why Do Ratchet Straps Come Loose During Transport?
Loose Ratchet Straps: Retighten or Replace?
The right action depends on the condition of the load and securing equipment:
-
Retighten: The cargo remains stable, the strap is undamaged, and the hooks, anchor points and ratchet buckle are functioning correctly.
-
Reposition and resecure: The cargo has shifted, tilted or developed gaps. Arrange for the load to be stabilised safely before adjusting the straps.
-
Remove from service: The webbing is cut, load-bearing stitching is damaged, fittings are deformed, or the ratchet does not lock securely.
Do not continue the journey until the load is secure. Never release lashings holding a leaning load until measures are in place to prevent it from falling.
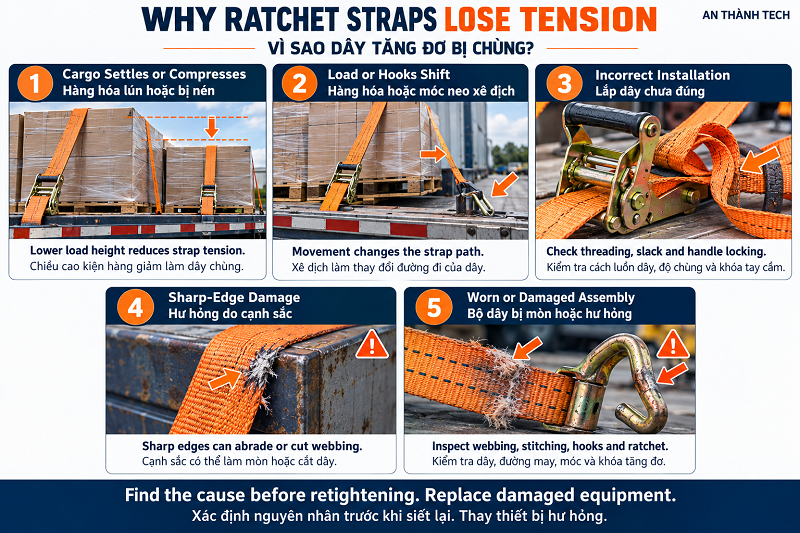
Why Ratchet Straps Lose Tension
1. Cargo Settles or Compresses
Cartons, bagged goods and stacked packages can settle as the vehicle moves. If the overall load height decreases, an over-the-top strap may no longer apply the same tension.
This can happen early in the journey, even when the straps appeared tight before departure.
2. The Load or Hooks Change Position
Braking, cornering and uneven roads can reveal weaknesses in the loading arrangement. Cargo movement or a hook shifting from its original position can change the strap path and reduce tension.
Check the load, hook seating and anchor points together. Tightening the ratchet without correcting the underlying movement may allow the problem to return.
3. The Strap Was Not Installed Correctly
Incorrect threading, excessive slack before ratcheting, twisted webbing or an incompletely locked handle can prevent the assembly from working as intended.
Follow the instructions for the specific ratchet model, including its threading method and required webbing wraps. Do not assume that every buckle uses the same setup.
4. Sharp Edges Damage the Webbing
Pallet corners, steel edges and machinery components can abrade or cut webbing during transport. This is a damage risk, not simply a tension adjustment issue.
Use suitable edge protection wherever straps contact sharp or abrasive surfaces. Remove damaged straps from service instead of tightening them further.
5. The Assembly Is Worn or Damaged
Worn webbing, broken stitching, bent hooks or a faulty locking mechanism can compromise the tie-down assembly.
Repeated loosening requires a full inspection. Check the cargo arrangement as well as the equipment before deciding that replacing the ratchet alone will solve the problem.
How to Check Loose Ratchet Straps
Step 1: Stop Safely
If you suspect load movement, reduce speed smoothly and find a safe place to stop. Avoid sudden braking or steering where possible.
Assess the load before approaching it. Keep clear of leaning cargo and seek qualified assistance if the load cannot be secured safely.
Step 2: Inspect the Cargo
Compare the load with its condition before departure. Look for:
-
Compressed packaging or reduced stack height.
-
Leaning, sliding or displaced goods.
-
New gaps between packages.
-
Damaged pallets or supports.
If the cargo has moved, stabilise and resecure it before continuing.
Step 3: Inspect the Complete Assembly
Check the full accessible length of webbing, stitching, hooks, anchor points and ratchet buckle.
Look for cuts, abrasion, deformation and incorrect positioning. Confirm that edge protectors remain in place and that the ratchet locks properly.
Step 4: Retighten or Replace
If the cargo is stable and the assembly remains serviceable, retension it according to the manufacturer’s instructions. Lock the handle and secure the loose webbing tail.
Do not use a pipe or improvised extension to increase tightening force. Replace damaged equipment with a suitable rated assembly.
Step 5: Record Recurring Problems
For fleet operations, record the strap position, load condition and corrective action on the trip checklist.
If the same position repeatedly loses tension, review the loading arrangement, anchor points and securing method.
When Should You Recheck Ratchet Straps?
Inspect the load and restraints before departure, early in the journey and regularly during transport. Additional checks are particularly important after harsh braking, sudden evasive manoeuvres or suspected load movement. DVSA highlights regular checks because restraints can lose tension and some loads settle in transit.
For U.S. truck operations covered by 49 CFR 392.9, drivers generally must inspect cargo and securement devices within the first 50 miles, approximately 80 km. Further checks are required at a change of duty status, after 3 hours, or after 150 miles, whichever occurs first. The regulation includes exceptions for certain sealed or inaccessible loads.
These are U.S.-specific requirements, not universal inspection intervals for transport in Vietnam or other countries. Follow the rules applicable to your route and operation.
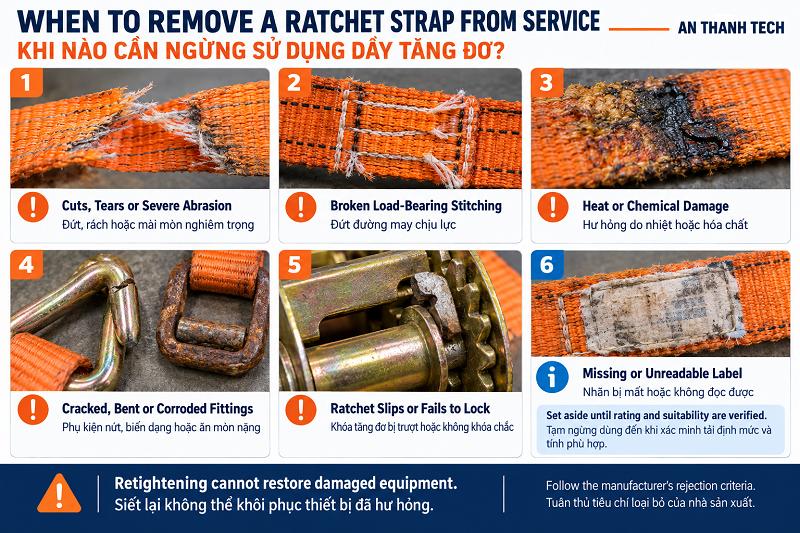
When to Remove a Ratchet Strap from Service
Stop using the complete tie-down assembly if you notice any of the following:
-
Cuts, tears or severe abrasion affecting the webbing.
-
Broken load-bearing stitching.
-
Heat or chemical damage.
-
Cracked, bent or heavily corroded fittings.
-
A ratchet mechanism that slips or fails to lock securely.
If the identification label is missing or unreadable, set the assembly aside until its rating and suitability can be verified in accordance with the manufacturer’s instructions.
Always follow the manufacturer’s rejection criteria. A single allowable cut size or damage percentage cannot determine whether every type of ratchet strap is safe to use.
Retightening cannot restore the strength of damaged webbing or hardware. Before continuing the journey, replace unsuitable equipment and confirm that the complete securing system is appropriate for the cargo and transport conditions.
Contact An Thanh Tech for Custom Manufacturing
For replacement hardware or custom metal manufacturing enquiries, contact An Thanh Tech’s mechanical manufacturing factory in Ho Chi Minh City, Vietnam.
Send your product photos or drawings, webbing dimensions, required ratings and quantity to:
WhatsApp / Zalo / Phone: +84 942 127 028
Email: cokhi.anthanhtech@gmail.com
Any replacement component must meet the original assembly manufacturer’s compatibility requirements.
References
Related News

09/11
2026
Knowing how to clean and store tie-down straps properly prevents webbing wear, stops ratchet rust, and ensures safe cargo transport. Follow these 3 simple steps to wash, dry, and store your straps for maximum longevity.

07/11
2026
Think all industrial greys look the same? Place RAL 7032 (Pebble Grey) next to RAL 7035 (Light Grey), and the contrast between warm beige-grey and bright silver-grey is unmistakable. Explore their exact color codes, powder coating specs, and ideal applications below to choose the right finish.

15/10
2026
Match a ratchet buckle, webbing, and hooks across four criteria: webbing width, complete-assembly load rating (WLL/LC), operating environment, and anchor-point geometry. Pair the buckle to the webbing’s exact width and thickness, rate the assembly by its weakest link, and ensure hooks seat fully without tip loading.

15/10
2026
Understanding ratchet buckle load ratings is essential for safe cargo securement. This guide explains the difference between WLL (Working Load Limit), LC (Lashing Capacity) and breaking strength, shows how to read a ratchet strap label, and helps buyers select the correct ratchet buckle assembly for US, EU and Australian transport applications.
View more